Cool Tricks
Save As
Sometimes one is working on incremental examples or code snippets like solution_v1.c, solution_v2.c, etc.
In vim, one can use :saveas to save the current buffer under a different name, so for example, to save the current buffer as foo.txt in the current directory, one can simply do:
:saveas ./foo.txt<CR>And if we want to save under a different directory, simply start typing the directory name and tab-completing the paths:
:saveas ./exa<Bab>
:saveas ./examples/e<Tab>
:saveas ./examples/easy/foo.txt<CR>
At any moment, it is possible to type Ctrl+d to display the possible further completions.

So one can keep doing something like this:
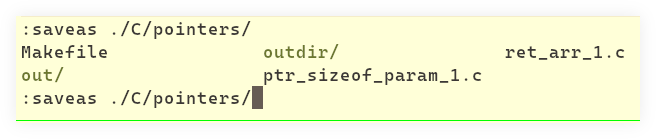
:saveas ./C/<Ctrl+d>
:saveas ./C/po<Tab>
:saveas ./C/pointers/<Ctrl+d>
:saveas ./C/pointers/solution_v2.c
That is, using a healthy mix of Tab and Ctrl+d one can easily and quickly find a place to save files.
But we can do even better for this scenario!
If we just want to keep saving v2, v3, etc. files in a given directory where the current v1 file is currently being edited, we can use vim register % (current filename path) to shorten some steps.
One can insert a register into the command line (or inside the current buffer) with Ctrl+r followed by register name. For example, Ctrl+r % will insert the current buffer name with its path relative the vim’s CWD into the buffer or command line.
Suppose you are editing ./C/pointers/easy/example_1.c, and you want to expand on that by making example_2.c.
First, save the current v1 as v2:
:saveas <Ctrl+r>%At this point we would have:
:saveas /home/user/projs/C/pointers/example_1.cSimply edit the 1 in example_1.c so that it looks like example_2.c and hit Enter.